
Welcome to the enchanting world of kids jewelry crafting! Today, we’re embarking on a magical journey to create stunning resin necklaces for kids. These necklaces are not just accessories; they’re treasures filled with love and imagination. So without any further interruption let’s dive right in to how to make a resin kids necklace!
This post contains affiliate links. That means if you click and purchase something through them, I may be compensated. This is at no extra cost to you.
Table of Contents
Materials Needed
Let’s gather our supplies and set the stage for our crafting adventure:
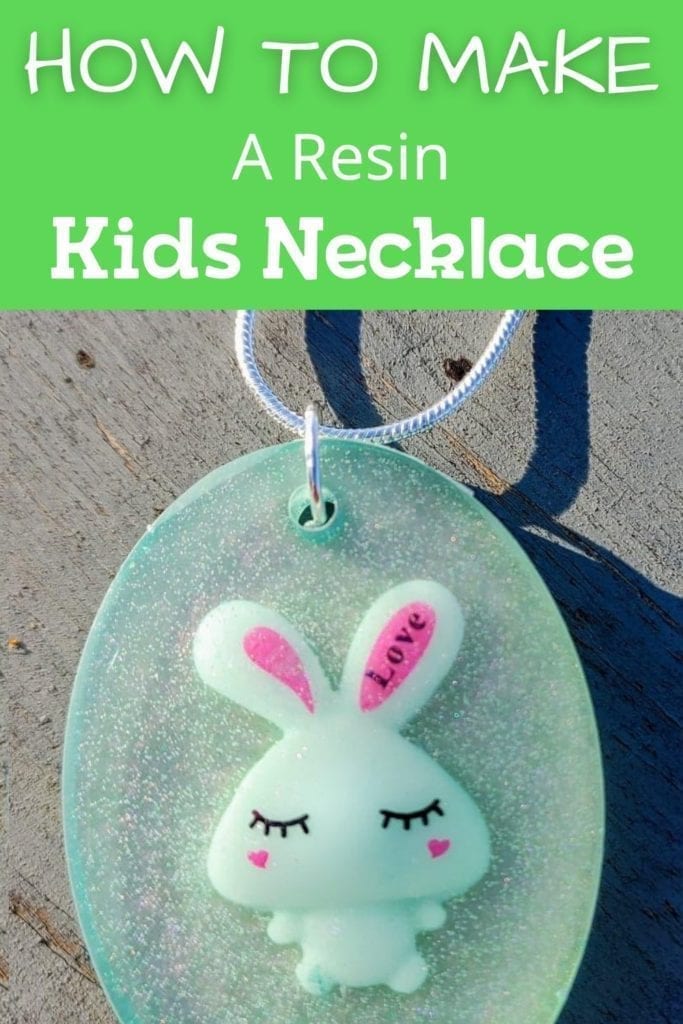
- Silicone Mold: Choose a mold in various shapes and sizes.
- Shimmering Mica Powder: Adds a touch of sparkle to the necklace.
- Resin and Hardener: Mix in equal parts to create the necklace base.
- Clay Polymer Charms: Select charming designs to embed in the resin.
- Popsicle Stick: Use for stirring the resin mixture.
- Tweezers (optional): Helpful for placing small charms in the mold.
- Heat Gun or Blow Dryer: Use to remove air bubbles from the resin.
- Sandpaper or Emery Board: Smooths rough edges of the necklace charm.
- 4-Sided Manicure Nail Buffer: Polish the charm for a shiny finish.
- Chain: Choose a chain to string the necklace charm.
- Jump Rings: Attach the charm to the chain securely.
- Pliers: Use to manipulate the jump rings during assembly.
Explanation of Materials Needed
- Selecting the Perfect Silicone Mold: Choose a mold that speaks to your creative spirit. Whether it’s a whimsical unicorn or a classic heart shape, the mold sets the tone for your necklace.
- Adding Shimmering Mica: A Touch of Magic: Dust the mold with shimmering mica powder, infusing your creation with a touch of sparkle and wonder.
- Mixing Resin: Creating the Foundation: Put on your crafting gloves and mix equal parts resin and hardener. Stir until smooth, like mixing colors on an artist’s palette.
- Choosing Clay Polymer Charms: Adding Personality: Select charming clay polymer charms to give your necklace its unique personality. From playful animals to colorful shapes, let your imagination run wild.
- Pouring and Setting: Capturing the Charm: Pour a thin layer of resin into the mold and gently place your chosen charm. This step is like capturing a precious memory in a timeless keepsake.
- Unveiling the Beauty: Polishing the Resin Necklace Charm: After curing, delicately remove the charm from the mold and polish it to a brilliant shine. Each charm is a work of art, waiting to be admired.
- Completing the Look: Assembling the Necklace: Attach the charm to a chain of your choice and voila! Your necklace is complete, ready to be worn and cherished.
Step 1: Selecting the Perfect Silicone Mold
Choosing the right mold is the first step in creating a magical resin necklace. Take your time browsing through the options, from elegant shapes to whimsical designs. Consider the personality of the recipient and let your intuition guide you.
Step 2: Adding Shimmering Mica: A Touch of Magic
Once you’ve chosen your mold, it’s time to add a touch of magic with shimmering mica powder. Imagine fairy dust sprinkled on a canvas, transforming it into a shimmering masterpiece. Use a paintbrush to dust the inside of the mold, ensuring even coverage for a dazzling effect.
Step 3: Mixing Resin: Creating the Foundation
Now, let’s mix up our resin and hardener. Put on your crafting gloves to protect your hands from the sticky mixture. Measure out equal parts resin and hardener and stir them together until fully combined. This step is crucial for ensuring a smooth and glossy finish.
Step 4: Choosing Clay Polymer Charms: Adding Personality
Next, it’s time to choose the perfect charm for your necklace. Clay polymer charms come in a variety of shapes, sizes, and designs, making it easy to find one that suits your vision. Whether it’s a cute animal or a whimsical shape, let your creativity shine as you select the perfect charm.
Step 5: Pouring and Setting: Capturing the Charm
With your charm chosen, it’s time to pour the resin into the mold. Start by pouring a thin layer of resin into the bottom of the mold, creating a base for your charm. Then, gently place the charm into the resin, making sure it’s centered and secure. This step is like capturing a precious memory in a timeless keepsake.
Step 6: Unveiling the Beauty: Polishing the Resin Necklace Charm
After 24 to 48 hours of curing, it’s time to unveil the beauty of your resin necklace charm. Carefully remove the charm from the mold, taking care not to damage it. Once removed, use sandpaper to smooth any rough edges, then polish the charm to a brilliant shine. Each charm is a work of art, ready to be admired and cherished.
Step 7: Completing the Look: Assembling the Necklace
With your charm polished and gleaming, it’s time to assemble the necklace. Attach the charm to a chain of your choice using a jump ring, then admire your handiwork. Whether it’s a sleek silver chain or a delicate gold one, the chain completes the necklace, ready to be worn and cherished.
Helpful Video
Here is a helpful video I found that shows some other great ideas for resin necklaces for kids!
Crafting Magical Memories
Congratulations! You’ve created a stunning resin necklace that’s sure to delight its recipient. Each charm is a tiny masterpiece, filled with love and imagination. As you admire your creation, take a moment to reflect on the joy it will bring to its wearer. Whether it’s a gift for a loved one or a treat for yourself, this necklace is more than just an accessory; it’s a magical memory to be cherished for years to come. Happy crafting!