
Making resin jewels is so easy and fun to do! You can make them any color you like and use them in many other crafts. Necklaces, bracelets, keychains, and more! I’ll show you how to make incredible color-popping resin jewels quickly and easily. Let’s begin!
*As an Amazon associate, this post may contain affiliate links, for which I may be compensated a small amount if you choose to click and purchase something—at absolutely no extra cost to you, of course!
Table of Contents
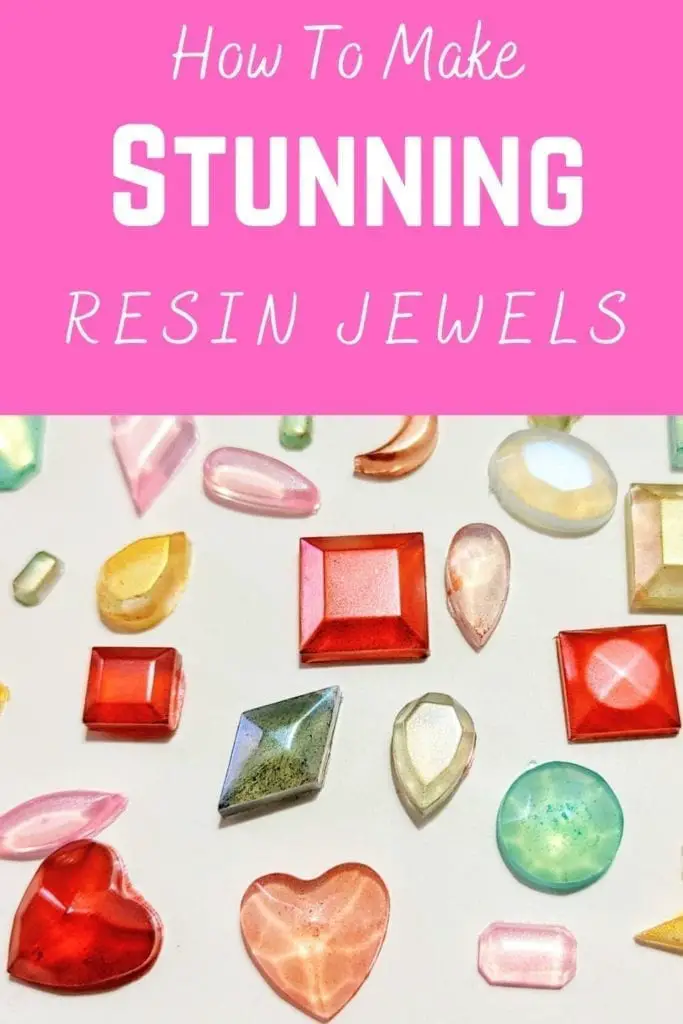
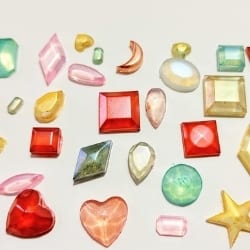
These resin jewels are absolutely stunning!
Let me show you my end result so you can understand just how beautiful these will turn out.
Let’s Get Started!
Before we create our beautiful resin jewels, let’s set up our workspace. Find a clean, flat surface where you can work comfortably. A stable area is essential to ensuring that your resin jewels turn out perfectly.
Once you’ve found your workspace, gather all the necessary materials. You’ll need your resin mold, resin, and hardener bottles, mica powders for coloring, a thin soft-bristled paintbrush, disposable rubber gloves, a straight popsicle stick for stirring, a dropper for precise pouring, and optional items like silicone mats or plastic wrap to protect your workspace.
Materials List:
- Resin mold: Choose a mold with cavities in the shape of jewels or gemstones.
- Resin and hardener: Use a high-quality resin and its corresponding hardener for optimal results.
- Mica powders: These shimmering powders will add color and depth to your resin jewels.
- Thin soft-bristled paintbrush: You’ll use this brush to dust the mold with mica powders.
- Disposable rubber gloves: Protect your hands from the sticky resin with a pair of gloves.
- Straight popsicle stick: Use this stick to stir the resin and hardener thoroughly.
- Dropper: For precise pouring of the resin into the mold.
- Silicone mat or plastic wrap: To protect your workspace from spills and drips.
- Measuring cup: Use a disposable measuring cup to measure equal parts of resin and hardener.
- Heat gun (optional): If available, use a heat gun to apply heat to the resin for faster curing and to remove surface bubbles.
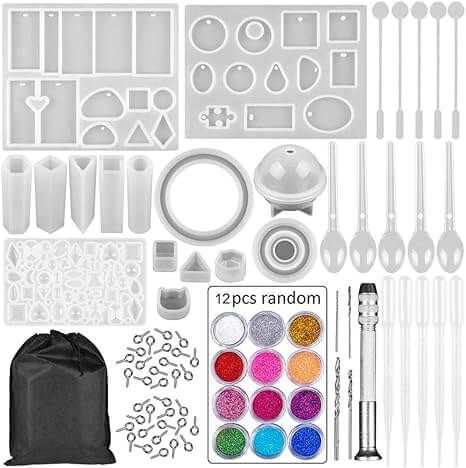
The image here shows a mold kit on Amazon that includes the jewel mold that was used. You can click here to navigate to Amazon to purchase it. It includes moon shapes, hearts, diamonds, and more. This particular kit has additional tools and droppers for a better crafting experience.
Setting Up Your Workspace
Place your mold on your chosen surface, ensuring it’s level and stable. Lay down a silicone mat or plastic wrap to protect your workspace from spills or drips. This step is crucial because the resin can be challenging to clean once it dries.
If you are concerned about what resin will and won’t stick to, you can check out this post about the very subject.
Now that your workspace is set up, let’s choose the perfect colors for our resin jewels.
Choose Your Colors
The key to creating stunning resin jewels is selecting the right colors. Mica powders come in a wide range of vibrant hues, allowing you to create jewels that are as unique as you are. Take your time browsing through your collection of mica powders and choose the colors that speak to you.
Consider the overall aesthetic you want to achieve with your jewels. Are you going for a bold, vibrant look, or prefer softer, pastel tones? Whatever your preference, mica powders offer endless possibilities for creativity.
Preparing Your Color Palette
Once you’ve chosen your colors, it’s time to prepare your color palette. Find a clean, flat surface for your palette—I recommend using a silicone mold for this step. Sprinkle a small amount of each mica powder onto the palette, creating a colorful array of powders to work with.
Be mindful not to use too much mica powder at once. A little goes a long way, and using too much powder can result in a muddy or uneven finish on your resin jewels. Start with a small amount of each color and add more as needed.
Dusting Your Mold Carefully With Color
With your color palette prepared, it’s time to add color to your resin mold. Using a thin, soft-bristled paintbrush, carefully dip the tip into the mica powder of your choice. Lightly dust the inside of each mold cavity with the colored powder, ensuring an even distribution of color.

Take your time with this step, as precision is key. Be sure to cover the entire surface of each mold cavity with your chosen colors, paying attention to any intricate details or patterns in the mold design.
Mixing Your Resin
Now that we’ve added color to our mold, let’s move on to mixing our resin. The resin consists of two parts: the resin itself and a hardener. Mixing these two components together thoroughly is essential to ensure proper curing and a strong, durable finish on your resin jewels.
Start by putting on your disposable rubber gloves to protect your hands from the sticky resin. Then, grab your bottles of resin and hardener and measure out equal parts of each into a clean, disposable measuring cup.
Additional Tips for Using Resin
When working with resin, it’s essential to follow a few additional tips to ensure successful results:
- Wear disposable rubber gloves to protect your hands from the sticky resin.
- Use a straight popsicle stick to stir the resin. Avoid using wavy sticks, as they can introduce air bubbles into the mixture.
- Stir the resin thoroughly, scraping the sides and bottom of the mixing cup to ensure all components are fully incorporated.
- If you’re working with a large batch of resin, consider pouring it in stages to minimize the risk of air bubbles forming in the mixture.
If you are brand new to resin or need a refresher I have a great beginner tutorial on resin here.
Pouring The Resin Into The Mold
With your resin thoroughly mixed, it’s time to pour it into the prepared mold. For smaller molds like the ones we’re using for our jewels, I recommend using a dropper for precise pouring. This will help you control the flow of resin and avoid any spills or messes.
Start by carefully pouring the resin into each mold cavity, filling them to the top. Take your time with this step, as precision is essential for achieving perfect results. If you accidentally overfill a mold cavity, don’t worry—you can always remove any excess resin later.
Covering And Letting The Resin Dry
Once you’ve poured the resin into the mold, it’s time to cover it and let it dry. If you have a heat gun, you can use it to apply a bit of heat to the resin before covering it. Heating the resin will help it cure faster and break up any surface bubbles that may have formed during the pouring process.
Once the resin is covered, let it dry for 12 to 24 hours, depending on the type of resin you’re using and the temperature of your curing location. It’s essential to let the resin cure completely before attempting to demold your jewels, as premature demolding can result in soft, bendy pieces that haven’t fully cured.
Popping Your Resin Jewels Out Of The Mold
After the resin has fully cured, it’s time to de-mold your jewels. Carefully pop each jewel out of its mold cavity, not damaging the delicate details or edges. If you notice any excess resin or rough edges on your jewels, you can use an X-acto knife or sandpaper to smooth them out.
Once your jewels are de-molded, take a moment to admire your handiwork. You should now have a beautiful collection of shiny resin jewels ready for use in all sorts of creative projects.
Optional Finishing Touches
If you’d like to add an extra touch of polish to your resin jewels, you can sand or polish them to achieve a smoother finish. Simply use a fine-grit sandpaper or a polishing compound to buff out any imperfections and bring out the shine of the resin.
Check out these other great posts about crafts you can make to sell and earn money online right away!
20 Stunning Resin Art Crafts To Make And Sell Right Now
Thanks for reading! Leave a comment if you’ve made any amazing resin crafts lately or if you have ideas for using resin jewels! Stay healthy and safe!