
Today I have a project that you are going to absolutely love. (I hope!) I will be showing you how to make easy no sew DIY throw pillows. Trust me this project is simple and fun. I went the extra mile to make my example pillow Fall themed for the upcoming Fall season. I will be sure to give you access to that free iron-on printable as well! Let’s get started!
Transparency Disclosure: This is a sponsored post. I was kindly gifted the fabric used in this project. The craft is original and all opinions are my own. As an Amazon Associate this post contains affiliate links as well. This means I may be compensated a small amount if you should click and purchase something through them. This is at no extra cost to you.
Table of Contents
Getting Started
To begin with this easy no sew DIY throw pillow project you will just need a few yards of your preferred fabric. Many people prefer fleece because it does not fray at the ends very much.
In my case I had sort of a unique situation. I received a large box of fabric from Fabric Wholesale Direct to use for this project.
They have this really cool option where you can get a 10 pound fabric scrap box with all kinds of mystery fabric. It was a huge surprise to see what was inside my box when it came!
The box was huge and had tons of fabric folded and stacked on top of each other. I dug through it looking for something ideal and I came across a tan cotton knit type fabric.
To me it screamed perfection so I went with it.
Iron on Fall Design (Optional Step)
This step is completely optional. You do not have to make a pillow with any iron-on design, but if you want to try it just keep reading!
First I easily designed my iron on using the t-shirt template on Canva.com. I saved the design and then uploaded it to Lunapic.com so that I could mirror the image.
To do so I just clicked “adjustments” and then “mirror”.
Once you have the file downloaded you can print it with any inkjet printer onto transfer paper.
I highly recommend getting transfer paper specifically designed for iron-ons. I like to use T-shirt transfer paper.
Next, cut out the design. It does not have to be 100% cut perfectly but enough to remove a lot of the white edges and to make it fit on your pillow.
Of course don’t worry about the writing being backwards. It will look correct once it is ironed on!
Ironing on the Design
For this I used my Cricut heat press but you could also use a regular household iron as well if you are careful when distributing the heat.
If you have a Cricut heat press or Easy Press just use the proper setting by checking the heat guide.
For my cotton knit fabric I just set my press to 315 degrees Fahrenheit.
For protection of your fabric you can place a bit of teflon between your fabric layers. I found these nifty teflon pillows on Amazon that I like to use.
Once the teflon or protective layer is in between your fabric you can heat up the top layer.
I just held my Cricut heat press on the fabric lightly for about 30 seconds. I let it cool for maybe a minute and then placed the iron on design face down where I wanted it.
Carefully I then placed the Cricut heat press on the iron on design for another 30 seconds. I moved it around a bit while keeping light pressure.
I removed the heat and let everything sit for another minute before flipping the top layer of fabric over and doing another round with the heat press for 15 seconds.
Peel the Backing From The Iron On
I recommend letting everything cool down for just a few minutes. Not that it needs to be cold before you do this but because you do not want to burn your fingers.
Once it is cool enough to touch, gently find piece of the iron on to grip onto. I started off to the right side and pulled to the left.
It took a moment but eventually it released the backing of the iron on and began to peel very smoothly.
Aligning and Cutting the Fabric
This entire project I measured by eyeballing. It really is fine if things aren’t 100% square although you can use proper fabric shears and markings to make straighter cuts if you like.
Basically I took a yard or two of fabric and folded it over itself as even as possible. This left me with two layers of fabric.
I cut the fabric into one large square.
I then cut squares from each corner of the larger square of fabric. (Make sure to cut both layers together.)
The squares do not have to be perfect as I mentioned before.
Next, cut even strips about an inch or two wide all along the remaining sides. It is up to you how long they are exactly but I just made mine long enough to be able to tie and dangle.
The main thing to keep in mind is that you want to cut through both sets of fabric because you will be tieing the opposite sides together all the way around once your pillow form is inserted.
Inserting The Pillow Form
It is totally up to you how you do this. Because this is simply a throw pillow I opted to use leftover fabric for the inside pillow form.
You can optionally use folded up hand towels, towels, or old clothes! It is seriously a great way to use waste fabric.
If you want actual pillow form you can easily snag some online to use. If you are going to be making multiple throw pillows you can certainly just buy a pack of them.
Closing Up The No Sew DIY Pillow
Finally you are going to want to tie up your pillow. Carefully tie each fringe to the one opposite it.
I like to do the corners first so that the fabric doesn’t shift so much when I tie them.
I definitely would try to tie the knots as tightly as you can without cinching the fabric too much.
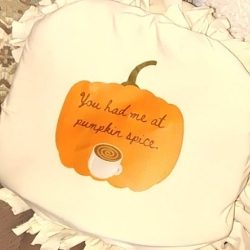
Once your DIY pillow is all tied up it should be ready to go!
Time To Use Your Easy No Sew DIY Throw Pillow
Your throw pillow should now be ready for use anywhere in your home! Use it as an accent piece on a couch, sofa, or chair.
Be sure to store it safely at season’s end so you can reuse it year after year! These types of pillows make lovely keepsakes because they are versatile and easy to make for any theme or holiday.
I hope you enjoyed this craft. Another huge thanks to Fabric Wholesale Direct for making it all possible with their awesome fabric selection!
Be sure to check out their website if you are looking for incredible fabric choices for any project.
Thanks for reading and happy crafting!