

Christmas isn’t terribly far off so it is a great time to get a jump start on ornament crafts. For this project we are going ultra simple, yet surprisingly elegant! Over the months, I’ve accumulated a lot of plastic lids and baby formula containers, so I’ve been trying to come up with ideas on how to reuse them. So naturally, I came up with an idea for diy ornaments for Christmas! Let’s take a look!
*As an Amazon Associate this post may contain affiliate links for which I may be compensated a small amount if you should purchase something through them. This is at no additional cost to you.
Table of Contents
Supplies You Will Need
- Plastic Lid
- Twine
- Mod Podge
- String/Yard/Ribbon (Any of those will work)
- Jump Ring & Charm of Choice
First, you will need a plastic lid. I suggest using thin plastic lids, like those found on formula containers, smaller coffee cans, and snacks.
Next, you will simply need twine to wrap around your lid. You could substitute other types of string or yarn, but I’ve found that twine works the best. You can wrap in a pattern or do more of a spiderweb-like I did.
Wrap Your Lid The Way You Like
I mention this because I am sure there are a bazillion creative ways to wrap your lids. I merely experimented with a spider web pattern, but I am sure you could do more of a star or snowflake design. In fact I will update this post as I find new ways to do it! (I have a ton of lids to work with!)
Paint Your Twine With Mod Podge
I did this so my string would harden in place and not be tempted to unravel or loosen up readily. Again, there are several techniques you could experiment with for this, but painting on the Mod Podge did just fine. It absorbed well into the twine and hardened as expected.
I have seen other people use spray glue for twine projects, and some even dip the twine into glue. Feel free to try any of those alternatives if you like. If you want to do exactly as I did, simply put a bit of Mod Podge on a paper plate and paint it on with a paintbrush. ¯\_(ツ)_/¯
Dip Dye In Food Coloring & White Vinegar
If you want your entire project to be colored, you can dye your twine before you wrap, but in my case, I dyed my twine afterward. Either way is fine. I held my lid in a bowl of food coloring dye for a few minutes.
The amount of food coloring and the period of time you hold your craft in the dye will determine the intensity of the color. Mine turned out a paler blue. Next time, I may try a different color combination, but I do love the way it turned out.
If you notice that your Mod Podge has loosened due to dye dipping, you could reapply it after your twine dries. I didn’t notice a huge change in the hardness of my twine, so I opted to skip that additional step.
Poke A Hole So You Can Add A Hanger
Since this will be hanging on a Christmas tree in my home I added a gold ribbon for a hanger. Depending on what you have around your home you may want to use other items. Yarn, string, bread ties, or a traditional hook are all viable options.
The great thing about crafts is that they are open to interpretation!
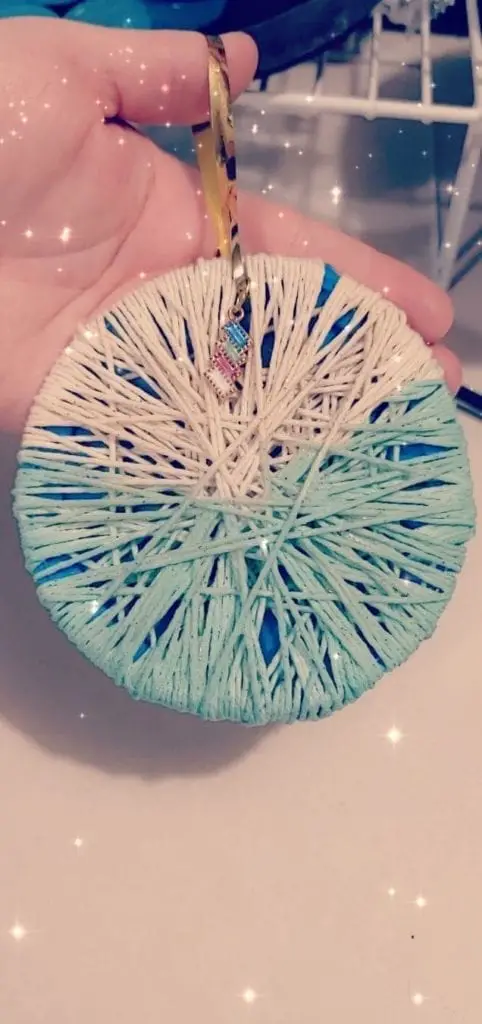
I poked a hole in my lid with a small drill bit. The drill itself wasn’t needed as the bit went through with ease after one turn. Then, I pinched my ribbon between thin tweezers and ran it through the hole. You could alternatively thread a needle with your hanging material to get it through.
Add A Charm
To make these diy ornaments for Christmas unique I decided to add shiny charms. You can use anything you have around. Maybe you have some beads, or bracelet charms lying around.
I had a few charms in my craft box and a gold jump ring. It added a lovely touch to my newly upcycled Christmas ornament.
Now Your Upcycled Christmas Ornament Is Ready!
After these few simple steps, you should have a 100% unique Christmas ornament for yourself. I loved the way my first one turned out, and I can’t wait to make a few more. As I complete them I will add the pictures to this post & Pinterest so you can have even more ideas.
If you enjoyed learning how to make DIY ornaments for Christmas, feel free to let me know in the comments. Also, please don’t hesitate to email me at [email protected] to showcase any of your own upcycled ornaments!
Happy Holidays…(I know I’m early, but I can’t wait!)